About La Coiffeuse

I'm a 26 year old living in the suburbs of DC. These are my stories about finding Mr. Right in all the wrong places. *cheers*
Showing posts with label Moroccan Oil Products. Show all posts

Wednesday, May 9, 2012

Greetings from NYC!


Hello from NYC!
Before I go into my post today, I'd like to take a minute and honor a legend in the hair industry-- Vidal Sassoon. 
RIP Vidal Sassoon
You will be greatly missed.

I'm up here for a Dreamcatchers Extensions Class and lucky me-- my good friend Claire just moved to Brooklyn so I'm staying with her. I have to say, Brooklyn is UH-MAZING.


I'm ready to pack everything I own and move on her pull-out couch & live the New York dream. 
So yesterday was my LAST DAY of my 30 Day Hair Challenge. Wooooo-hooooo! I can't believe I managed to stay sane throughout the whole thing. And after 30 days ... my hair has gotten ridiculously longer than it was when I started. :) *chest bump* So now, if anyone has trouble growing out of their hair when they reach the awkward stage-- I'm directing them to my 30 Day Hair Challenge.


Day Trente
Hippie Handband
So the last time I tried to rock the hippie headband look--
it was NYE. And the way I positioned the headband in the
middle of my forehead. And it was so tight I about 
gave myself an aneurism. 
So I decided on the last day of my challenge that I'd try
the style that I love so much but couldn't rock---until now. 
Products Used: Moroccanoil Treatment
Tools Used: Flat Iron to Curl + Headband + Bobby Pins
How-To: Curl hair with flat iron (or curling iron or wand). See Day Quatre.
Place headband in over hair. 
Normally when you put in a headband you place it underneath your hair
against your nape. But this time put it over your hair.
This will push the hair at your crown up, giving you a fuller look.
Since I have a HUGE forehead that I don't like to accentuate,
 I don't place the headband directly on it.
 But if you can-- more power!
Position the headband about 1 inch away from hairline.
Secure with bobby pins if needed.
Finish with Luminous Hairspray.

Seriously, I CANNOT get enough of NYC. I'm quite upset that I'm leaving tomorrow night to come home. Woommpppp-Woommppppp. My friend Claire has taken me to some of the best restaurants I've ever been to. Food coma all the way.

Cafe Giante

The.best.French.Bistro.Ever.
'nuff said.


The Lodge
Mac and Cheese is to die for.
Literally.
Nighty-night from Brooklyn! Be sure to stay tuned for a Dreamcatchers Extensions Post! I'm so excited to share what I learned. :)


Monday, May 7, 2012

6 Day Catch Up

Man, I swear times goes by so flipping fast. I feel like my youth is starting to slip through my fingers at the age of 22. 5 days ago, I told myself that I'd post my Day 24 hairstyle tomorrow-- and tomorrow turned into Day 29. 
Well ... great news! I decided to make my first post-college big girl purchase last week ...
Yes, I finally hopped on the Mac Book Train and buckled down and bought my very first Mac Book. I've been so busy that today is the first day that I can actually use it!  My poor PC was on life support for the past few months, but I didn't have the heart to let it go. But when it kept over heating and shutting itself off every time I tried blogging-- I just had to pull the plug. You know what that means? Be sure to stay tuned for picture and video tutorials. *thumbs up*
In other great new before I post the Day 23-29 hairstyles, I am going to NYC tomorrow. It was a last minute trip for a rescheduled Dreamcatchers Extensions class. I'm taking the bus up tomorrow with my friend Claire and staying with her until Thursday. And I will be posting while in NYC! Very exciting.

Okay-- Ladies & Gents your Feature Presentation ...


Day Vingt-Quatre
Half Up-Half Down
This is quick and easy-especially when you're running out
the door-- like I was last Wednesday.
It's nothing fancy, but it gets your hair out of your face.
Funny thing, I remember this being one of my favorite
hairstyles when I was in elementary school!
Products Used: Aveda Damage Remedy Daily Repair
Morrocanoil Luminous Hairspray
Tools Used: Round Brush + Dryer + Black Elastic Band
How-To: After blowing hair out straight, take half of hair
and tie with elastic band.
Finish with Luminous Hairspray.


Day Vingt-Cinq
Bun, bun, bun, bun, bun.
What's different from this bun than my Ballerina Bun
is that I left more loose pieces in the front.
The Ballerina Bun gives a more sleek style versus this
is a lot more soft.
Tools Used: Curling Rod + Black Elastic Band
How-To: Leaving pieces of hair out in the front and around the face,
wrap hair into bun and tie with black elastic band.
If some pieces are sticking out from bun, 
use Luminous Hairspray to lay them down.
Using curling wand, wrap loose hair around to give slight bend.
You don't want too much curls-- you don't want them to be tendrils.


Day Vingt-Six
Twisty-Twister
This style is similar to Day 15 Double Braid's Hairstyle,
but instead of braids, it's twists. 
And I realized after doing the Double Braids with the center-part,
I do not like showing off my forehead THAT much.
That's a lot of forehead.
The side part softens the look and doesn't make it as harsh.
Products Used: It's a 10 Leave-In
Tools Used: Flat Iron (to curl) + Bobby Pins
How-To: Curl hair with either flat iron, curling iron, or wand.
Part hair off side and take 1 inch sections and twist upward & back.
Twist until about 1 inch of hair is left.
Secure with bobby pin.

On Day 27-- I reunited with my college girlfriends for a fashion show. I attended my college's fashion show as an alumni. The college that I went to (Marymount University) puts on a fashion show every year before graduation. The fashion students submit garments for the show and the seniors show their senior collections. I can not believe it's been a year since my clothes were on the runway. (For those of you who don't know-- aside from doing hair, I went to school for fashion design.)
My designs for the fashion show last year.
Back to the point-it was so nice to reunite with my girlfriends. I've missed them SO much. It's just not the same now that our desks aren't next to each-other.
Kelly & I
Dana D, Kelly, Me, Dana C
Kathleen, Denise, Rachel, Me
The Danas & I
Day Vingt-Sept
Bump-It
Products Used:Kendra Volume Spray Super Hold Finishing Spray 25
Moroccanoil Treatment
Tools Used: Teasing Brush + Bobby Pins
How-To: Section 4 inch section in front. (Width of the bump can vary depending on how
wide you like it.) With teasing brush, tease the section.
Height of the bump will vary depending on how high you want it.
Using the Kendra 25 Spray slick sides back.
Secure sides with bobby pins.
Be sure to conceal bobby pins-- this style has a sleek finish so you don't
want to show any bobby pins.
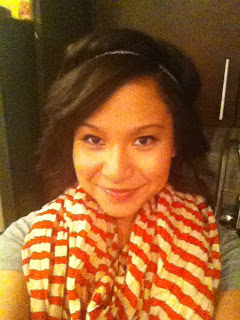
Day Vingt-Huit
Headbands GaloreWhat I realized now that I have longer hair ...
I HAVE NO HAIR ACCESSORIES.
I literally have 3 headbands and 2 flowers.
So my next step: Update my accessories bin.
Products Used: Aveda Damage Remedy Daily Hair Repair
It's a 10 Miracle Shine Spray with Noni Oil
Tools Used: Round Brush + Dryer + Headbands
How-To: Blow hair out with flip. See Day Deux.
Place in 2 small headbands.
Finish with It's a 20 Miracle Shine Spray.
Woo-hoooooooooo!!!!!!!! I can't believe tomorrow is the last day of my 30 Day Hair Challenge! I freakin' did it! :) Today's hairstyle wasn't that welcomed at the salon today ... my bosses weren't thrilled that I rolled into the salon Au-Naturel. (I managed to pull it back into a bun just so I wouldn't get fired for most of the day.) I figured, hey- might as well show you guys what I look like with no effort. Take this as warning, you've been warned.
 
Day Vingt-Neuf
Au-Naturel
My natural hair is NOT cute.
Not cute by any means. It's flat on top with frizzy wavy ends.
SUPER FRIZZY ENDS. It's really a pain in the rear-end.
I feel like my hair can tell weather or not it's gonna rain.
As a kid, I used to have ringlet curls. Over the years, they've flattened & frizzed.
Gee, thanks puberty.
Products Used: N/A
Tools Used: N/A
How-To: Wash & Go

Stay tuned for tomorrow's final post from NYC! :) I'm super excited!! 

Monday, April 30, 2012

Catching Up Hair

Hello again! Another weekend has come and gone. It's difficult for me to post on the weekends because it's the busiest time at the salon- and my little social life that I try to have. So when Friday night comes, I blink and the weekend is over. So here it goes ...

On Friday night, I went out with the man-friend for a friends birthday straight from work. I forgot to snap a picture before I left but managed to get a picture (that showed my hair) while we were out.

Day Dix-Neuf
Loose Braided Updo
I recreated the exact style the next day so you guys could get a closer look.

Day Dix-Neuf
Loose Braided Updo
Products Used: Moroccanoil Luminous Hairspray
It's a 10 Miracle Shine Spray with Noni Oil
Tools Used: Flat Iron or Curling Iron or Curling Wand + Bobby Pins
How-To: Curl hair (See Day Quatre) with either flat iron, curling iron, or curling wand.
(I use a flat iron to give a messier curl.)
Braid hair on one side. (See Day Onze)
Instead of braiding bangs into the braid, leave bangs down.
After securing braid with a bobby pin, take one inch sections of hair
and begin to pin up in the back.
It's super easy because it's supposed to be soft, romantic and imperfect.
Continue to braid until all pieces of hair are pinned.
Spray with Shine Spray & Luminous Hairspray to finish.
Day Vingt
Braided Faux Shave with Le Fleur
This was a twist off my Day Treize: Faux Shave.
Again, I'm contemplating on whether or not I should shave the side again.
So I decided to play around with the faux shave, except this time with a braid.
Products Used: Aveda Damage Remedy Daily Hair Repair
Alterna Caviar Polishing Serum
Tools Used: Round Brush + Dryer + Bobby Pins + Une Fleur
How-To: Blow out hair straight. (See Day 1)
French braid on one side of the hair until top of ear.
Secure in place with bobby pins.
Don't worry about concealing bobby pins because the flower will cover them.
It's more important to secure the braid in place.
Pin flower accessory in.
Finish with polishing serum for a smooth & shiny finished look.

E
Day Vingt Et Un
Piggy Tails
Yes, I did it ... pig tails.
Let's see, I haven't worn my hair in pigtails since I was in MIDDLE SCHOOL!
But hey desperate times, calls for desperate measures.
I don't think they looked all that bad, eh?
Products Used: Moroccanoil Luminous Hairspray
It's a 10 Miracle Shine Spray with Noni Oil
Tools Used: Flat Iron to curl +2  Black Elastic Bands + 2 Bobby Pins
How-To: Using a flat iron, curl hair. (See Day Quatre)
Divide hair into 2 pigtails and secure with black elastic band.
Typically I use clear elastic bands, but since I wanted the bands
to blend in with my hair, I used the black ones.
Be sure to leave pieces out of the pigtails.
These are more adult pigtails, so they don't have to be perfect.
Then using one bobby pin on each side,  pin pigtail close to hairline.
(Be sure to conceal bobby pin.)
This holds the pigtails in place. So they won't stick straight out by the end of the day.
Finish with Shine Spray and Luminous Hairspray.
Day Vingt-Deux
Sassy Bun
When I did the Charlize Theron Chignon on Day Huit,
I loved have my bangs brushed back.
So today, I brushed back my bangs with this messy bun.
It gave it a more elegant look with the bangs brushed back.
Products Used: Moroccanoil Luminous Hairspray
Tools Used: Black Hair Tie + Teasing Brush + Bobby Pins
How-To: Leave bangs down, using Teasing Brush + Luminous Hairspray
brush back hair into a sleek ponytail.
Tie with hair tie.
Divide pony tail into 4 parts.
Using bobby pins, pin parts of pony tail into bun.
It's okay for hair to stick out of bun.
I like the no-so-polished look.
Tease bangs and brush back with teasing brush.
Lightly finish with Luminous Hairspray.
Less than a week until my challenge is over. My mind is blank as to what style I will do tomorrow. Be sure to stay tuned. Mohawk?

Thursday, April 26, 2012

Ombre Thursday

Grab a glass of wine ladies, we're having girls night. Tonight's discussion: Ombre.
Before we get into a full blown debate of "oh-no she didn'ts", here's today hairstyle. I had today off, and since I decided it would be a splendid idea to sleep the day away ... I ended up running around doing errands to prepare myself for the work week. (My work week starts on Fridays and ends on Tuesdays.) 

Day Dix-Huit
Slick Back Pony
Products Used: Moroccanoil Luminous Hairspray
It's a 10 Miracle Shine Spray with Noni Oil
Tools Used: Teasing Brush + 2 Clear Elastic Bands + Bobby Pins
How-To: Using teasing brush, brush hair back into sleek pony tail.
I like using the teasing brush because it really lays down the fly-aways.
Use clear elastic to tie pony tail.
I always use 2 elastics just to make sure the band doesn't
break throughout the day.
Taking a piece of hair from pony tail, wrap around clear elastic to hide.
Secure with bobby pins.
Use Luminous Hairspray to keep fly-aways down.
Finish with Shine Spray.
(Go easy on the shine spray. You don't want a greased down look.)

Alright, pajamas on with a glass of wine in hand ... I'm ready for girls night.
So topic of the night: ombre hair.
Yay or nay? Is its 15 minutes of fame up? Will everyone forget what it is by this time next year? Or will everyone and their mothers be rocking the boho color? At the salon, we're pretty split. Some of the stylists don't like it at all, while others love it. Me? I'm split ... I believe ombre can look very good if done right, but if done wrong ... it can be SO wrong.
When I first thought about ombre phenomenon... I was appalled! The only thing I could think about was Sarah Jessica Parker in Season 2 and 3 of Sex and the City with her awful roots.
Photo Source
If anyone knows me, you know that I absolutely adore SJP. I have the biggest girl-crush on her and would love to get my hands in her hair. I love love love her, but her roots in Season 2 & 3 ... not so much. I remember watching the show when I was a kid, (yes--I watched Sex & The City in middle school) and thinking ... who the hell told her that was cute?!
I can say, SPJ's hair has definitely improved throughout the years ... and it's her ombre that is on the top of my Ombre Yes List.

My Ombre Yes List
Photo Source
She's absolutely flawless!
Her ombre is very natural. Very sun-kissed.
I love that her ends are not drastically lighter than her roots.
SJP has always looked amazing with golden tones.
Photo Source
Another take on SJP's ombre. Her roots are a little darker
than in the picture above. Although her ends are very much
lighter than her roots, she has highlights framing her face
to off-set the dark roots and light ends.
Face framing high-lights is a must if you're planning to go darker on your roots.
Photo Source
Well done Jamie!
I was skeptical about ombre in the first place... now ombre on an Asian girl?
I was so against it ... until I saw it on Jamie Chung.
Lightening Asian hair is tricky. About 90 percent of the time,
it will turn a not so pretty blonde-orange.
And blorange is NOT cute.
I love that she stuck with golden and caramel tones.
And the golden brown high-lights that frame her face are gorgeous.

Photo Source
I saw Khloe Kardashian on What What Happen's Live the other night,
and practically drooled over the TV.
I was never a big fan of Khloe's ombre on Khloe & Lamar,
but I am all for this!
I like that she kept it in the brown family.
Ombre is tricky on girls with dark hair, because it can look
super trashy- super quick.
But keeping your ends a bit darker keeps things much more natural.

Photo Source
Who doesn't love Lauren Conrad?
The girls at the salon know my obsession with anything LC.
I've always loved her ombre. (Or should I say.. HER)
She's naturally a blonde, so the color graduation is smooth
and soft from her roots to ends.
Again, the highlights around her face brightens her color.
Photo Source
If there's Lauren, there has to be Whitney.
I love that she has blonde honey tones through-out her ombre.
Photo Source
Yes, Giuliana Rancic.
Again, like the others she has face framing highlights to
soften the contrast between the dark and light.
And if you look closely, the underneath of her hair is still dark.
I think that gives it a more dimensional look.
Ombre is all about dimension.

They all can't be perfect. Ombre can go very wrong. I mean VERY WRONG.

My Ombre No List
Photo Source
Seriously Drew?
Now I know Drew Barrymoore has always had the "roots" look ...
But this ... this is a prime example of ombre gone wrong.
The blonde has been taken too far and there's no gradual transition between
the dark brown roots and the fried blonde ends.
And the braid?  Oh no.

Photo Source
Hey Rihanna, your roots called.
They want their hair color back.
Photo Source
Now I believe us sassy short hair gals can rock ombre,
just not like this.
There is so much blonde that it looks like she hasn't gotten her
roots touched up in 6 months.
This would have looked better if there was less blonde,
and if the blonde was worked underneath.


Photo Source
Okay Ashley, I can see a line.
No bueno. There's no gradual change of color.
Just dark and then brassy orange ends.
Classic ombre gone wrong.


I hate to through LC under the bus, but straight ombre?
Not my cup of tea. As shown above, ombre works very well
with wavy hair. The boho beachy wave is perfect.
When wore straight, I just see fried ends. :(

Photo Source
Raven has such long hair ... the possibilities could be endless with ombre!
Her hair is so long that you could go from dark brown roots
to blonde ends beautifully.
But bl-orange? Really??!! Come on!

Photo Source
I never liked Audrina as a blonde. Even on her Hills days
when she had blonde highlights.
No, No, No.
Really?!- No.

Ombre Tips:
  • Although I believe that ombre can look good on short hair, I'll side with the long hair gals on this one. The longer the hair, the more length there is for the graduation between dark and light.
  • Wavy for ombre. Wearing it straight makes it seem like you haven't been to a hair stylist in years. And if you do wear it straight, make sure your ends aren't fried.
  • Keep your ends healthy! Since your ends are getting the most damage, make sure to use the right products and come in for regular trims.
  • 3 words, Face Framing Highlights. By having some highlights from roots to ends around your face, it will soften the contrast.
  • Don't go pitch black roots to platinum blonde ends. Keep your ombre within 3-5 shades of each other. Let's not relive SJP bad roots days.
  • Having the "roots" look doesn't mean you should neglect seeing your stylist. If you're going a little bit lighter as your base color, you still have to regularly come in for root touch up. And if you have face framing highlights-- those need to be touched up regularly as well. 
  • Not every stylist does ombre ... be sure to talk to your stylist for a consultation.
I got a chance to do ombre on our lovely receptionist the other day. I loved the way it turned out! :)  
I took her from a warm dark brown to golden caramel ends ...